continuous deployment for HoloLens with Unity

In this document, I’d like to describe our way of doing continues deployment for HoloLens when using Unity3D for development.
Quick-Overview
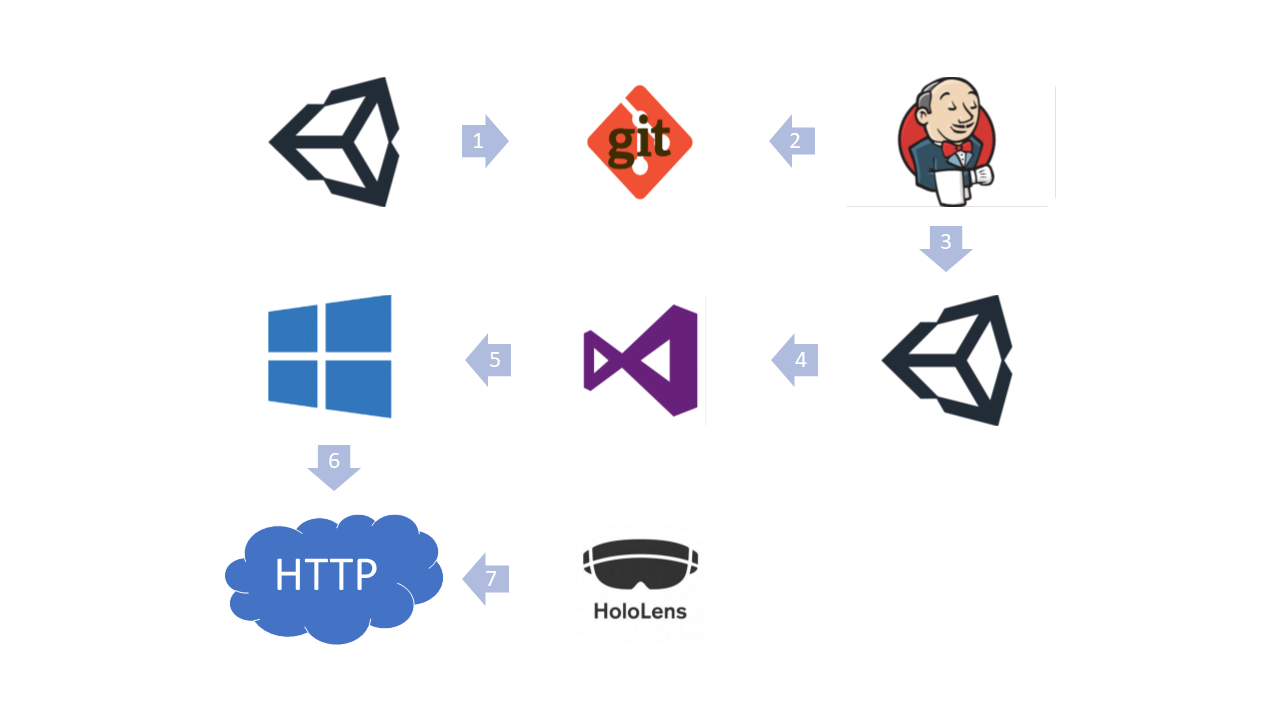
The icons belong to the companies they symbolize. They’re just used for better understanding.
| Steps | Description |
|---|---|
| 1 | Source-code is pushed to git |
| 2 | Jenkins pulls code from git (either on Build request or based on time settings) |
| 3 | Jenkins starts to build in Unity |
| 4 | Jenkins start building Visual Studio Solution |
| 5 | Build Result is an App-Package with „.appinstaller“ File and index.html |
| 6 | File Server Hosts Build Result |
| 7 | HoloLens checks File Server for app updates |
Software and Versions:
At the time I’m writing this (January of 2019) I use the following software with the provided versions but I think (and hope) it should be also working on upcoming versions.
| Name | version | URL |
|---|---|---|
| Unity Pro | 2018.2.20f1 | https://unity3d.com/de/get-unity/download |
| GitLab Community Edition | 11.4.11 | https://about.gitlab.com/ |
| Visual Studio Professional 2017 | 15.9.4 | https://visualstudio.microsoft.com |
| Jenkins | 2.150.1 | https://jenkins.io/ |
| Windows SDK | 10.1.17763.132 | https://developer.microsoft.com/en-us/windows/downloads/windows-10-sdk |
| HFS ~ Http File Server | 2.3m | http://www.rejetto.com/hfs/ |
In detail:
Developing in Unity will mostly be the same as before. But in addition to your code, you need at least one method to handle the build process.
For my project the „Build“-class has the following content:
using System;
using System.Collections;
using System.IO;
using System.Linq;
using System.Xml.Linq;
using UnityEditor;
using UnityEngine;

public class Build
{
    private const string UWP_SDK_VERSION = "10.0.17763.0";

    /// <summary>
    /// start build process for HoloLens App
    /// </summary>
    //adding to Unity menu for quick testing
    [MenuItem("Holographic/Build/Start", false, 0)]
    public static void StartBuild()
    {
        var path = string.Empty;
        foreach (DictionaryEntry dic in System.Environment.GetEnvironmentVariables())
        {
            if (dic.Key.ToString().Equals("WORKSPACE", System.StringComparison.InvariantCultureIgnoreCase))
            {
                path = "" + dic.Value;
                break;
            }
        }
        if (string.IsNullOrEmpty(path))
        {//backup for building outside of Jenkins
            path = new DirectoryInfo(Path.Combine(Application.dataPath, "../UWP")).FullName;
        }

        string[] scenes = EditorBuildSettings.scenes.Select(s => s.path).ToArray();
        string locationPathName = (path + "\\output\\UWP");
        BuildUnity(locationPathName);

        UpdateVCXProj(locationPathName);
        UpdatePackageManifest(locationPathName);

    }

    /// <summary>
    /// letting unity create visual studio solution
    /// </summary>
    /// <param name="locationPathName"></param>
    private static void BuildUnity(string locationPathName)
    {
        BuildPlayerOptions opts = new BuildPlayerOptions
        {
            scenes = EditorBuildSettings.scenes.Select(s => s.path).ToArray(),
            targetGroup = BuildTargetGroup.WSA,
            target = BuildTarget.WSAPlayer,
            locationPathName = locationPathName
        };
        PlayerSettings.SetScriptingBackend(opts.targetGroup, ScriptingImplementation.IL2CPP);
        EditorUserBuildSettings.wsaUWPSDK = UWP_SDK_VERSION;

        BuildPipeline.BuildPlayer(opts);
        Debug.Log("COMPLETED Unity Build:" + opts.locationPathName);
    }

    /// <summary>
    /// Updating Visual Studio project file
    /// Setting SDK Version and auto-update props
    /// </summary>
    /// <param name="locationPathName">path to solution folder</param>
    private static void UpdateVCXProj(string locationPathName)
    {//c:\workspace\DLR-Demo\UWP\output\UWP => c:\workspace\DLR-Demo\UWP\output\UWP\ProjectName\ProjectName.vcxproj
        var vcxPath = Path.Combine(locationPathName, string.Concat(PlayerSettings.productName, "\\", PlayerSettings.productName, ".vcxproj"));
        var content = File.ReadAllText(vcxPath);
        content = System.Text.RegularExpressions.Regex.Replace(content,
            "<WindowsTargetPlatformMinVersion>[\\d.]+</WindowsTargetPlatformMinVersion>",
            string.Concat("<WindowsTargetPlatformMinVersion>", UWP_SDK_VERSION, "</WindowsTargetPlatformMinVersion>"));

        content = content.Replace("<AppxBundle>Auto</AppxBundle>",
            "<AppxBundle>Always</AppxBundle>\r\n" + //Force creating App Bundle
            "    <GenerateAppInstallerFile>True</GenerateAppInstallerFile>\r\n" + //..and App Installer (for automatic update)
            "    <AppxAutoIncrementPackageRevision>True</AppxAutoIncrementPackageRevision>\r\n" + //doesn't matter because version is generate everytime
            "    <AppxBundlePlatforms>x86</AppxBundlePlatforms>\r\n" + //HoloLens uses x86
            "    <AppInstallerUpdateFrequency>1</AppInstallerUpdateFrequency>\r\n" + //auto-update enabled
            "    <AppInstallerCheckForUpdateFrequency>OnApplicationRun</AppInstallerCheckForUpdateFrequency>\r\n" + //try updating every App start
            "    <AppxPackageDir>\\\\sv201168\\Holographic\\UWP\\" + PlayerSettings.productName + "\\</AppxPackageDir>\r\n" + //network drive share where we keep our HoloLens App-Builds
            "    <AppInstallerUri>http://holo-buildslave/UWP/" + PlayerSettings.productName + "/</AppInstallerUri>"); //HTTP-File Server (just mirroring the Network Drive)
        File.WriteAllText(vcxPath, content);
    }

    /// <summary>
    /// Updating the Version for the App based on current Date and Time
    /// </summary>
    /// <param name="locationPathName">path to solution folder</param>
    /// <returns></returns>
    private static bool UpdatePackageManifest(string locationPathName)
    {
        var buildDir = Path.Combine(locationPathName, string.Concat(PlayerSettings.productName, "\\"));
        // Find the manifest, assume the one we want is the first one
        string[] manifests = Directory.GetFiles(buildDir, "Package.appxmanifest", SearchOption.AllDirectories);

        if (manifests.Length == 0)
        {
            Debug.LogError(string.Format("Unable to find Package.appxmanifest file for build (in path - {0})", buildDir));
            return false;
        }

        string manifest = manifests[0];
        var rootNode = XElement.Load(manifest);
        var identityNode = rootNode.Element(rootNode.GetDefaultNamespace() + "Identity");

        if (identityNode == null)
        {
            Debug.LogError(string.Format("Package.appxmanifest for build (in path - {0}) is missing an <Identity /> node", buildDir));
            return false;
        }

        var versionAttr = identityNode.Attribute(XName.Get("Version"));

        if (versionAttr == null)
        {
            Debug.LogError(string.Format("Package.appxmanifest for build (in path - {0}) is missing a version attribute in the <Identity /> node.", buildDir));
            return false;
        }

        // preparing and updating new package Version
        var version = PlayerSettings.WSA.packageVersion;
        var now = DateTime.Now;
        //Attention: this method only works until the year 2099 ;)
        var newVersion = new Version(now.Year - 2000, now.Month * 100 + now.Day, now.Hour, now.Minute * 100 + now.Second);

        PlayerSettings.WSA.packageVersion = newVersion;
        versionAttr.Value = newVersion.ToString();

        var deps = rootNode.Element(rootNode.GetDefaultNamespace() + "Dependencies");
        var devFam = deps.Element(rootNode.GetDefaultNamespace() + "TargetDeviceFamily");
        devFam.Attribute(XName.Get("MinVersion")).Value = UWP_SDK_VERSION; //set min WinSDK Version to desired
        devFam.Attribute(XName.Get("MaxVersionTested")).Value = UWP_SDK_VERSION;//same for max WinSDK verison
        rootNode.Save(manifest);
        return true;
    }
}
I hope every necessary piece of code is commented to your desire. 😉
That’s it for the code side now up to the jenkins configuration.
I won’t go into the general job configuration in jenkins too much, but basically, the job has to get the code from the repository and then start the Unity build first and if so after the Visual Studio build.
I’m using both of the available Jenkins plugins for Unity and MSBuild:
https://wiki.jenkins.io/display/JENKINS/Unity3dBuilder+Plugin
https://wiki.jenkins.io/display/JENKINS/MSBuild+Plugin
But you could easily just call both of the following commands.
::Start Unity and call Build-Method
"C:\Program Files\Unity\Hub\Editor\2018.2\Editor\Unity.exe" -projectPath c:\Workspace\workspace\ProjectName -logFile c:\Workspace\workspace\ProjectName\unity3d_editor.log -quit -batchmode -executeMethod Build.StartBuild -buildTarget WindowsStoreApps
::Start MSBuild
"C:\Program Files (x86)\Microsoft Visual Studio\2017\Professional\MSBuild\15.0\Bin\MSBuild.exe" /t:Build /p:Configuration=Master /p:Platform=x86 /verbosity:m output\UWP\ProjectName.sln "
Pay attention to where you want the Unitylog (-logFile) to be. And at first I wanted to use the standalone MSBuild that comes with the SDK, but there were problems that I couldn’t solve and that didn’t occur when I used Visual Studio’s MSBuild.
After both builds are finished, which can really take some time, mainly because I use IL2CPP, some files are created on my network drive.
If you open the index.html it looks something like this.
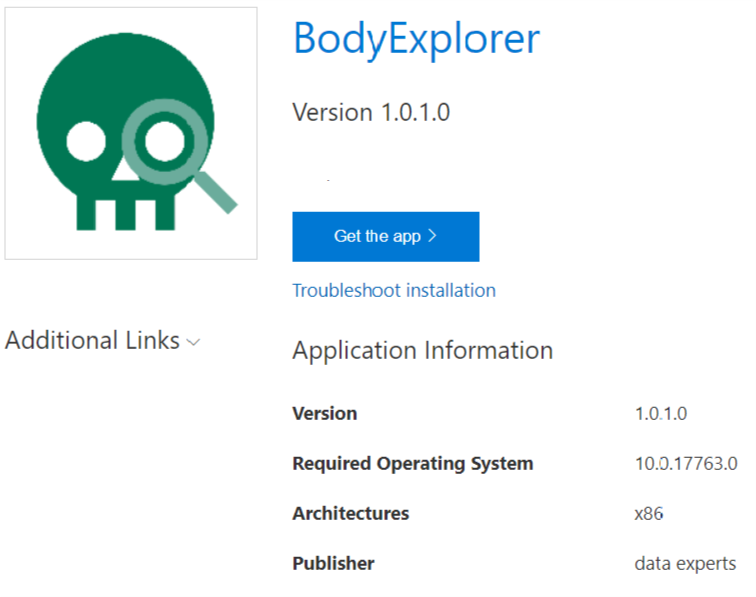
Sadly for now ( Windows 1809) the HoloLens does not support direct install with a click on „Get the app“ .. it just tries and will search for an app which handles the URL „ms-appinstaller:***“.
But if you’re using the „Windows Device Portal“ you can easily install the app using the appinstaller file. You find a link to this file under the „Additional Links“ Drop Down on the left of the generated index.html.
This link can then be easily installed using the „Windows Device Portal“ from the HoloLens (Views/Apps/Deploy apps/Network).
From now on every time you start the App on the HoloLens it tries to install an update using the configured URL.
When Building the app again MSBuild will automatically override the necessary files and put the new version next to it.
For a better understanding, I did not include unit testing within Jenkins, but please run and evaluate the tests before creating the app package.